Difference between revisions of "Military Transporter"
Pathfinder (talk | contribs) m (→Up = Cooked Pilot: cr: cockpit link) |
m (+cleaned up page and tested new temp.) |
||
| (20 intermediate revisions by 12 users not shown) | |||
| Line 1: | Line 1: | ||
{{CargoShipinfobox | {{CargoShipinfobox | ||
| name = Military Transporter | | name = Military Transporter | ||
| − | | image = | + | | image = Military_Transporter_Mk2_full.jpeg |
| class = Military | | class = Military | ||
| − | | mass = | + | | mass = 5578454 |
| + | | speed = 10 | ||
| boobytrap = yes | | boobytrap = yes | ||
| − | | | + | | directfireweapons = none |
| − | | | + | | exteriordefense = 3x [[Missile Turret]],5x [[Gatling Turret]] |
| − | | | + | | interiordefense = 5x [[Interior Turret]]s |
| shipsize = large | | shipsize = large | ||
| − | | version = 01. | + | | version = 01.030.008 - |
}} | }} | ||
Military Transporter [[Cargo Ships|cargo ship]] | Military Transporter [[Cargo Ships|cargo ship]] | ||
| − | |||
| − | |||
== Defences == | == Defences == | ||
| − | === | + | === Exterior Defences === |
This is a military ship, so it's no surprise that it's heavily guarded. | This is a military ship, so it's no surprise that it's heavily guarded. | ||
| − | * | + | * 1 [[Gatling Turret]], and 1 [[Missile Turret]] on top |
| − | + | * 1 [[Gatling Turret]] at the bottom | |
* 2 [[Gatling Turret|Gatling Turrets]] on the front | * 2 [[Gatling Turret|Gatling Turrets]] on the front | ||
| − | * | + | * 1 [[Gatling Turret]] on the rear, and |
| − | * | + | * 1 [[Missile Turret]] on each side |
| + | |||
| + | each Turret has an dedicated [[Small Cargo Container]] for additional ammunition. | ||
| + | |||
| + | === Interior Defences === | ||
| + | There are 5 [[Interior Turret|interior turrets]] somewhat evenly spaced throughout the entire ship's interior.<br/> | ||
| − | == | + | == Drones == |
| − | + | The specific [[antenna]] that spawns [[drone|drones]] has a range of 882 meters and is named: "Hostiles detected - Requesting Backup". This antenna within range will spawn either a [[Incisor_mk.1|Incisor]] or less frequently a [[Eradicator_mk.1|Eradicator]] drone in defense; They are much more formidable with the later being a serious threat, in the unlikely event it spawns. They will spawn 3000 meters away from the player and every 5 minutes up to a total number of 2 drones active any time. | |
| − | |||
== Trap == | == Trap == | ||
=== Reverse = Boom === | === Reverse = Boom === | ||
| − | [[File:CargoShip_MilitaryTransporter_TrapBoom.jpg|150px|thumb|right|1) Triggering the trap<br/>2) explositon<br/>3) Ship wreckage after [[Warhead | + | [[File:CargoShip_MilitaryTransporter_TrapBoom.jpg|150px|thumb|right|1) Triggering the trap<br/>2) explositon<br/>3) Ship wreckage after [[Warhead]] is triggered]] |
| − | [[File: | + | [[File:Military Transporter Mk2 Trap overview.jpg|150px|thumb|right|map of [[Small Thruster]] and [[Warhead]]]] |
<table border=0><tr><td> | <table border=0><tr><td> | ||
| − | |||
</td><td> | </td><td> | ||
| − | This ship has | + | This ship has 1 [[Warhead]] with a dedicated [[Small Thruster]] to detonate it when reverse thrust is fired. |
| − | |||
| − | |||
| − | |||
| − | |||
| − | + | The trigger can be seen on the overall map (linked on the right). | |
| − | |||
| − | |||
| − | + | A good strategy to avoid triggering this is to turn on a thruster and look around the ship to see if any thruster has been turned on. If no thrusters have when you preform this action, then that thruster must be a trap. This will be difficult if you do not have third person view. | |
| − | |||
| − | ''' | + | '''Trigger'''<br/> |
| − | + | This can be found directly below the interior light in front of the central [[Large Cargo Container]] in the hangar of the ship or from below (as shown in the overview) | |
| − | + | [[File:Military_Transporter_Mk2_Trap_location.jpg|400px]] | |
| − | |||
</td></tr></table> | </td></tr></table> | ||
| − | If the | + | If the warhead is detonated the ship will be heavily damaged, and you may be killed. |
| − | + | The central [[Large Cargo Container]] and the interior of the hangar will be lost. | |
| − | |||
| − | + | [[File:Military Transporter Mk2 detroyed Hangar.jpg|400px]] | |
| − | [[File: | ||
| − | |||
| − | |||
| − | |||
| − | |||
| − | |||
| − | |||
| − | |||
| − | |||
== Tactics == | == Tactics == | ||
=== Approach === | === Approach === | ||
| − | As of [[Update_01. | + | As of [[Update_01.030.008|v.1.030]] ([[Change_Log|list]]), the [[Gatling Turret|Gatling Turrets]] and [[Missile Turret|Missile Turrets]] are functioning and will shoot you if you are moving with more than 3m/s.<br/> |
| − | + | Best aproach is, so far, to use several decoys (can be real [[Decoy]] or any block moving with more than 3 m/s) to distract the turrets.<br/> | |
| + | Alternatively you can move exactly in the path of the ship at a distance of more than 800m and activate the [[Inertia dampeners]] to keep absolutely still.<br/> | ||
| + | Short before the ship is about to hit you, match speed with ship. But stay really close to the ship and out of the target area of the turrets.<br/> | ||
| + | Then access a terminal link and turn the turrets off (or the "Target moving objects" option) | ||
| + | |||
| + | ==== Tactic #1 (with a ship)==== | ||
| + | Align yourself in front of the ship( on its course ) at least 800-900m away and stay as dead fish in a barrel. Wait for ship to approach you. Align your ship orientation,so your landing gears face top of transporter - it has few long section of armor, perfect for hard landing. Dust off a bit from Transporter trajectory, just enough for Transporter to fly by without hitting you. Now here is the tricky part. You need to perform hard landing. Turn off inertia dampeners if you have them enabled and engage reverse thrusters, but DON'T exceed 3m/s. When Transporter flies by(it should travel at 10m/s), touch down and lock landing gears. If you perform this properly( don't exceed 3m/s on touchdown) you should land and turrets will target you, but won't fire. Now, use your ship main thrusters to stop Transporter - if you turn on inertia dampeners, speed should be reduced to ~1,2m/s. Once you do, access any panel and kill turrets. Now you have to disarm thurster and warhead. | ||
=== Attack === | === Attack === | ||
| − | As of [[Update_01. | + | As of [[Update_01.030.008|v.1.030]] ([[Change_Log|list]]), the [[Gatling Turret|Gatling Turrets]] and [[Missile Turret|Missile Turrets]] are functioning and will shoot you if you are moving with more than 3m/s<br/> |
| − | + | With an exterior made entirely of Heavy Armor blocks with no easy locations to exploit, the Military Transporter is, by far, the most durable target of all the NPC ships. Heavy armor is all-but-immune to small ship weaponry, meaning that advanced tactics must be used. | |
| − | + | ||
| + | === Entry === | ||
| + | (outdated/ to be updated) | ||
| − | |||
This ship has many ramps inside, but it can most simply be described as having 2 levels.<br/> | This ship has many ramps inside, but it can most simply be described as having 2 levels.<br/> | ||
Without using the grinder (or damage from an attack), the only way to enter the ship is through the front door (shown by white curved arrows on the right of the ''Upper Level'' image below | Without using the grinder (or damage from an attack), the only way to enter the ship is through the front door (shown by white curved arrows on the right of the ''Upper Level'' image below | ||
| − | ==== | + | ==== Upper level ==== |
| − | + | (outdated/ to be updated) | |
| − | |||
[[File:CargoShip_MilitaryTransporter_Floorplan_L2.jpg|800px]] <br/> | [[File:CargoShip_MilitaryTransporter_Floorplan_L2.jpg|800px]] <br/> | ||
The upper level can be accessed directly through gaps in the sides of a large door made from white and black [[Heavy Armor Block|Heavy Armor Blocks]] (indicated by white curved arrows). <br/> | The upper level can be accessed directly through gaps in the sides of a large door made from white and black [[Heavy Armor Block|Heavy Armor Blocks]] (indicated by white curved arrows). <br/> | ||
Straight ahead is a [[Large Cargo Container]] protected by an [[Interior Turret]] <br/> | Straight ahead is a [[Large Cargo Container]] protected by an [[Interior Turret]] <br/> | ||
Entry to the lower level can be accessed by using any of the 4 [[Door|doors]] in this area, the rest can be read from the maps. <br/> | Entry to the lower level can be accessed by using any of the 4 [[Door|doors]] in this area, the rest can be read from the maps. <br/> | ||
| − | Using this method, you must encounter at least 3 [[Interior Turret|Interior Turrets]] to reach the [[Cockpit | + | Using this method, you must encounter at least 3 [[Interior Turret|Interior Turrets]] to reach the [[Cockpit 2|cockpit]], so I don't recommend it. |
| + | |||
| + | ==== Lower level ==== | ||
| + | (outdated/ to be updated) | ||
| − | |||
[[File:CargoShip_MilitaryTransporter_Floorplan_L1.jpg|800px]] <br/> | [[File:CargoShip_MilitaryTransporter_Floorplan_L1.jpg|800px]] <br/> | ||
The lower level can be accessed by using a [[Grinder|grinder]] on the shp's left or right-most [[Steel Catwalk|steel catwalk]] panel (on the end of those things that look like wheels)<br/> | The lower level can be accessed by using a [[Grinder|grinder]] on the shp's left or right-most [[Steel Catwalk|steel catwalk]] panel (on the end of those things that look like wheels)<br/> | ||
| − | If entering on the ship's left side using this method, take the first right, go up the ramp, and you'll get shot in the face by a [[Interior Turret|turret]]. '''But''', then you'll find the ship's [[Cockpit | + | If entering on the ship's left side using this method, take the first right, go up the ramp, and you'll get shot in the face by a [[Interior Turret|turret]]. '''But''', then you'll find the ship's [[Cockpit 2|cockpit]]! |
=== Disable === | === Disable === | ||
| − | The offending reverse | + | The offending reverse thruster trap can be disabled by either: |
| − | * Turning | + | * Turning off the offending [[Small Thruster]] from the [[Cockpit 2|cockpit]] or any terminal link. (small Thruster 28) |
| − | * Removing /disabling the small | + | * Removing /disabling the small thruster with a [[Grinder|grinder]] |
| − | Access to | + | Access to the thruster is described in the "Trap" section above. |
| − | When you can access the | + | When you can access the thruster, use the grinder on the thrusters, at least until they are disabled, then you're ready to go. |
Alternatively, if you're in a hurry, you can maneuver the ship to where you need it by only applying thrust in a forward direction. <br/> | Alternatively, if you're in a hurry, you can maneuver the ship to where you need it by only applying thrust in a forward direction. <br/> | ||
| Line 116: | Line 108: | ||
== Salvage == | == Salvage == | ||
| − | + | === Cargo containers === | |
Each of the 3 [[Large Cargo Container|large cargo containers]] can easily be raided. | Each of the 3 [[Large Cargo Container|large cargo containers]] can easily be raided. | ||
| + | The 12 [[Small Cargo Container|small cargo containers]] are near the turrets and hold extra ammunition. <br/> | ||
| + | Cargo found so far: (the actual Cargo contents may vary) | ||
| + | * [[Welder (Tool)|Welders]] | ||
| + | * [[Grinder|Grinders]] | ||
| + | * [[Hand Drill|Hand drills]] | ||
| + | * [[Automatic Rifle|rifles]] | ||
| + | * [[Computer|Computers]] | ||
| + | * [[Detector Components|Detector components]] | ||
| + | * [[Interior Plate|Interior plates]] | ||
| + | * [[Medical Components|Medical components]] | ||
| + | * [[Metal Grid|Metal grids]] | ||
| + | * [[Thrust Components|Thrust components]] | ||
| + | * [[25x184mm_NATO_Ammo_Container|25x184mm ammo containers]] | ||
| + | * [[5.56x45mm NATO Magazine|5.56x45mm magazines]] | ||
| + | * [[200mm Missile Container|missile containers]] | ||
| − | + | === Reactors === | |
| − | There are 2 [[Small_Reactor|small reactors]], | + | There are 1 [[Large Reactor]], and 2 empty [[Small_Reactor|small reactors]] <br/> |
| + | Cargo summary: | ||
| + | * 1,04kg [[Uranium Ingot|Uranium]] | ||
| + | Amounts may vary due fuel consumption | ||
== Ship Composition: == | == Ship Composition: == | ||
| − | + | === Thrusters & gyros === | |
| + | * 10x [[Large_Thruster|Large thrusters]] | ||
| + | * 15x [[Small_Thruster|Small thrusters]] | ||
| + | * 14x [[Gyroscope|Gyroscopes]] | ||
| + | |||
| + | === Reactors === | ||
| + | * 1x [[Large Reactor]] | ||
| + | * 2x [[Small_Reactor|Small reactors]] | ||
| + | |||
| + | === Cargo System === | ||
| + | * 3x [[Large Cargo Container|large cargo containers]] | ||
| + | * 12x [[Small Cargo Container|small cargo containers]] | ||
| + | * 1x [[Collector]] | ||
| + | * 1x [[Connector]] | ||
| + | |||
| + | ==== Miscellaneous ==== | ||
| + | * 1x [[Beacon]] | ||
| + | * 10x [[Door|Doors]] | ||
| + | * 1x [[Gravity Generator|Gravity generator]] | ||
| + | * 4x [[Landing Gear|Landing gears]] | ||
| + | * 2x [[Spotlight|Spotlights]] | ||
| + | |||
| + | == Changes: == | ||
| + | As of [[Update_01.030.008|v.1.030]] ([[Change_Log|list]]), the new Military Transporter is less heavily armed and has only one boobytrap. But the cargo capacity is enlarged due to the additional [[Small Cargo Container|small cargo containers]]. | ||
| + | It is also much more nimble due to the increased number of [[Gyroscope|Gyroscopes]] (14 instead of 2) <br/> | ||
| + | |||
| + | New version in front, old version behind. | ||
| + | <gallery widths=500px heights=500px> | ||
| + | File:Military Transporters Mk1 and Mk2 front.jpg | ||
| + | File:Military Transporters Mk1 and Mk2 below.jpg | ||
| + | </gallery> | ||
| − | + | ==See Also== | |
| + | * [[Cargo Ships]] | ||
| + | * [[Military Escort]] | ||
| + | * [[Military Minelayer]] | ||
| − | + | [[Category: Cargo Ships]] | |
| + | [[Category: Military Ships]] | ||
Latest revision as of 12:27, 11 November 2015
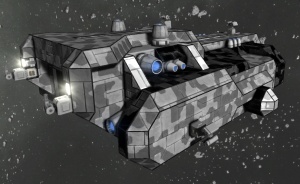
Military Transporter cargo ship
Defences
Exterior Defences
This is a military ship, so it's no surprise that it's heavily guarded.
- 1 Gatling Turret, and 1 Missile Turret on top
- 1 Gatling Turret at the bottom
- 2 Gatling Turrets on the front
- 1 Gatling Turret on the rear, and
- 1 Missile Turret on each side
each Turret has an dedicated Small Cargo Container for additional ammunition.
Interior Defences
There are 5 interior turrets somewhat evenly spaced throughout the entire ship's interior.
Drones
The specific antenna that spawns drones has a range of 882 meters and is named: "Hostiles detected - Requesting Backup". This antenna within range will spawn either a Incisor or less frequently a Eradicator drone in defense; They are much more formidable with the later being a serious threat, in the unlikely event it spawns. They will spawn 3000 meters away from the player and every 5 minutes up to a total number of 2 drones active any time.
Trap
Reverse = Boom
|
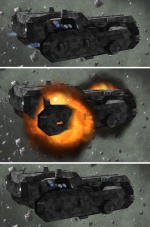
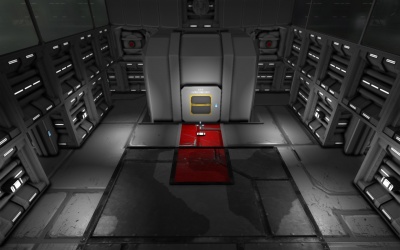
This ship has 1 Warhead with a dedicated Small Thruster to detonate it when reverse thrust is fired. The trigger can be seen on the overall map (linked on the right). A good strategy to avoid triggering this is to turn on a thruster and look around the ship to see if any thruster has been turned on. If no thrusters have when you preform this action, then that thruster must be a trap. This will be difficult if you do not have third person view. Trigger |
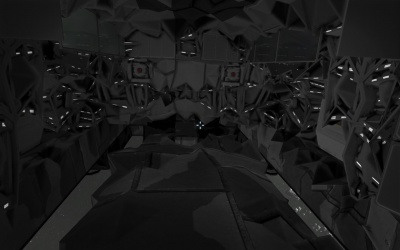
If the warhead is detonated the ship will be heavily damaged, and you may be killed. The central Large Cargo Container and the interior of the hangar will be lost.
Tactics
Approach
As of v.1.030 (list), the Gatling Turrets and Missile Turrets are functioning and will shoot you if you are moving with more than 3m/s.
Best aproach is, so far, to use several decoys (can be real Decoy or any block moving with more than 3 m/s) to distract the turrets.
Alternatively you can move exactly in the path of the ship at a distance of more than 800m and activate the Inertia dampeners to keep absolutely still.
Short before the ship is about to hit you, match speed with ship. But stay really close to the ship and out of the target area of the turrets.
Then access a terminal link and turn the turrets off (or the "Target moving objects" option)
Tactic #1 (with a ship)
Align yourself in front of the ship( on its course ) at least 800-900m away and stay as dead fish in a barrel. Wait for ship to approach you. Align your ship orientation,so your landing gears face top of transporter - it has few long section of armor, perfect for hard landing. Dust off a bit from Transporter trajectory, just enough for Transporter to fly by without hitting you. Now here is the tricky part. You need to perform hard landing. Turn off inertia dampeners if you have them enabled and engage reverse thrusters, but DON'T exceed 3m/s. When Transporter flies by(it should travel at 10m/s), touch down and lock landing gears. If you perform this properly( don't exceed 3m/s on touchdown) you should land and turrets will target you, but won't fire. Now, use your ship main thrusters to stop Transporter - if you turn on inertia dampeners, speed should be reduced to ~1,2m/s. Once you do, access any panel and kill turrets. Now you have to disarm thurster and warhead.
Attack
As of v.1.030 (list), the Gatling Turrets and Missile Turrets are functioning and will shoot you if you are moving with more than 3m/s
With an exterior made entirely of Heavy Armor blocks with no easy locations to exploit, the Military Transporter is, by far, the most durable target of all the NPC ships. Heavy armor is all-but-immune to small ship weaponry, meaning that advanced tactics must be used.
Entry
(outdated/ to be updated)
This ship has many ramps inside, but it can most simply be described as having 2 levels.
Without using the grinder (or damage from an attack), the only way to enter the ship is through the front door (shown by white curved arrows on the right of the Upper Level image below
Upper level
(outdated/ to be updated)
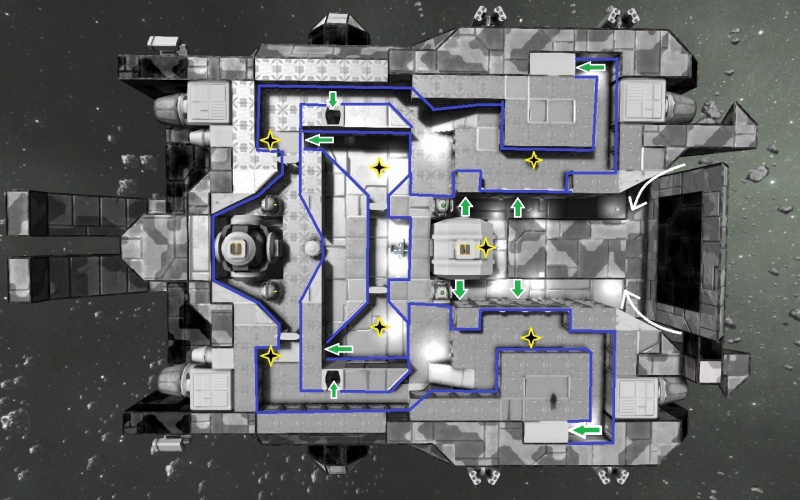
The upper level can be accessed directly through gaps in the sides of a large door made from white and black Heavy Armor Blocks (indicated by white curved arrows).
Straight ahead is a Large Cargo Container protected by an Interior Turret
Entry to the lower level can be accessed by using any of the 4 doors in this area, the rest can be read from the maps.
Using this method, you must encounter at least 3 Interior Turrets to reach the cockpit, so I don't recommend it.
Lower level
(outdated/ to be updated)
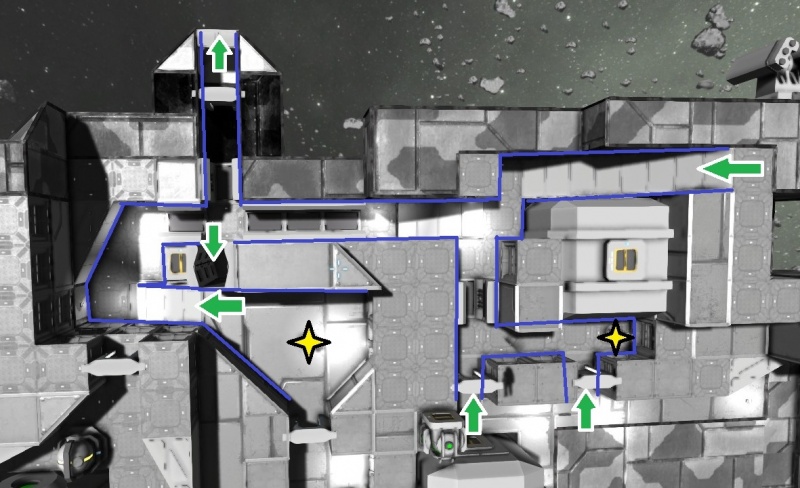
The lower level can be accessed by using a grinder on the shp's left or right-most steel catwalk panel (on the end of those things that look like wheels)
If entering on the ship's left side using this method, take the first right, go up the ramp, and you'll get shot in the face by a turret. But, then you'll find the ship's cockpit!
Disable
The offending reverse thruster trap can be disabled by either:
- Turning off the offending Small Thruster from the cockpit or any terminal link. (small Thruster 28)
- Removing /disabling the small thruster with a grinder
Access to the thruster is described in the "Trap" section above.
When you can access the thruster, use the grinder on the thrusters, at least until they are disabled, then you're ready to go.
Alternatively, if you're in a hurry, you can maneuver the ship to where you need it by only applying thrust in a forward direction.
This will mean that you need to point the ship away from your destination before you switch on the dampeners.
Salvage
Cargo containers
Each of the 3 large cargo containers can easily be raided.
The 12 small cargo containers are near the turrets and hold extra ammunition.
Cargo found so far: (the actual Cargo contents may vary)
- Welders
- Grinders
- Hand drills
- rifles
- Computers
- Detector components
- Interior plates
- Medical components
- Metal grids
- Thrust components
- 25x184mm ammo containers
- 5.56x45mm magazines
- missile containers
Reactors
There are 1 Large Reactor, and 2 empty small reactors
Cargo summary:
- 1,04kg Uranium
Amounts may vary due fuel consumption
Ship Composition:
Thrusters & gyros
- 10x Large thrusters
- 15x Small thrusters
- 14x Gyroscopes
Reactors
- 1x Large Reactor
- 2x Small reactors
Cargo System
- 3x large cargo containers
- 12x small cargo containers
- 1x Collector
- 1x Connector
Miscellaneous
- 1x Beacon
- 10x Doors
- 1x Gravity generator
- 4x Landing gears
- 2x Spotlights
Changes:
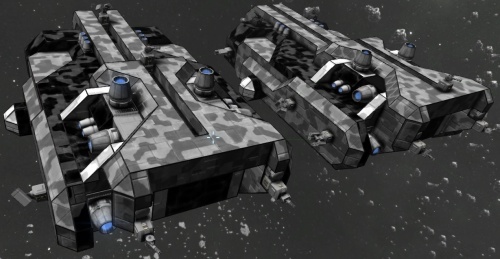
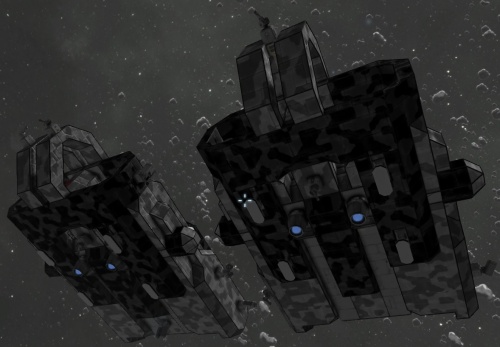
As of v.1.030 (list), the new Military Transporter is less heavily armed and has only one boobytrap. But the cargo capacity is enlarged due to the additional small cargo containers.
It is also much more nimble due to the increased number of Gyroscopes (14 instead of 2)
New version in front, old version behind.
